Quick Steps to Add Printer to Windows 10 By Using IP Address
Printers are the basic necessity of every office. You need to add your printer to the computer or Mac devices to complete your printing tasks. There are different ways to add a printer to the Windows computer. But adding a printer to the Windows computer by using an IP address is the easiest way. If you don’t know how to add a printer to Windows 10, then don’t fret. This blog will assist you with Windows 10 Add Printer By IP. keep reading the blog and follow the below steps to add a printer to Windows 10.
Quick steps to add a printer to Windows 10 by using an IP address
You should know the IP address of your printer to add it to the Windows 10 computer. Go through the below-mentioned steps to add a printer to Windows 10 by using the IP address:
Step 1: First and foremost, open the settings on your Windows computer, and tap on the “device” option.
Step 2: After that, select the “printers and scanner” option from the left panel and tap on the “add a printer and scanner” section.
Step 3: On the next screen, tap on the “the printer I want isn’t listed” button and proceed further.
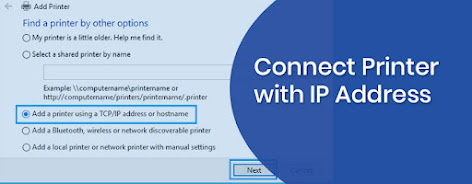
Step 4: Then, you need to select the “Add a printer using TCP/IP address” option and tap on the “Next” button.
Step 5: In the next step, type the IP address of your printer in the given field and tap on the “Next” button.
Step 6: If your printer is on, then the Window will find your printer; otherwise, you need to add more information about your printer.
Step 7: After that, select the manufacturer name from the left panel and printer model number from the right panel and tap on the “Next” button.
Step 8: If your printer is not listed, then you need to tap on the “Windows Update” button.
Step 9: Then, type your printer name and tap on the “Next” button to proceed further.
Step 10: Now, select either “Do not share this printer” or “share this printer” and tap on the “Next” button.
Step 11: Finally, tap on the “print a test page,” followed by, the “finish” button.
Alternatively, you can add your printer by using the control panel. Follow the below-mentioned steps to add the printer to Windows 10:
Step 1: First of all, tap on the magnifying glass and enter the “control panel” in the search bar.
Step 2: Select the “hardware and sound” option and tap on the “devices and printer” section.
Step 3: After that, tap on the “add a device” tab and then hit the “the printer that I want isn’t listed” button.
Step 4: Now, select the “Add a local printer” option and tap on the “Next” button.
Step 5: Then, tap on the “create a port” option and select the “Standard TCP/IP port” option.
Step 6: After that, tap on the “Next” button to proceed further.
Step 7: On the next Window, enter the IP address, port name, and tap on the “Next” button.
Step 8: Enter your printer name and select the “Do not share this printer” option.
Step 9: Select the “set as the default printer” option and finally tap on the “finish” button.
That’s all about Windows 10 Add Printer By IP. Hopefully, the steps mentioned above will help you to add the printer to Windows 10 computer by using the IP address.


Comments
Post a Comment